Spain
Spain
 Portugal

Protection of the VDS Linux virtual server
After purchasing a virtual server, the first thing you need to do is set it up and take care of VDS protection. In this article, I will show you how to properly configure and protect a virtual server on Linux. Let's go!
More on the topic: A forensic case of hacking servers running Linux
We will consider configuring VDS using the example of the Ubuntu distribution, but the instructions are also relevant for other distributions.
First, read the instructions, get into it, understand what you need and what you don't need, and only then use the recommendations! If you just copy and apply some commands in the console under the root, you may lose access to the server. Of course, support will help you and restore access, but no one will be able to restore the time you spent.
Changing the password of the root user
Usually, after purchasing a virtual server, you should be informed of its IP address and user password. The password can be found in the server control panel. Usually a password is created by a password generator and stored in a database. Such passwords do not always meet the requirements. This means that it is better to change it immediately.
Log in to SSH with root rights and enter the following command:
|
passwd
|
When changing the password, the characters will not be displayed — this is normal. Enter the new password and press Enter. At this stage, we have already secured ourselves a little. Now you can proceed with the subsequent configuration.
For security reasons, it is worth changing the password at least once every six months (the more often the better).
There are different strategies to ensure the security of the root account:
You create a user account with a name known only to you, give it the opportunity to use the sudo command (so that you can edit configuration files and install software), and then disable SSH login for the root user. At the exit, we will receive password authentication, but an account whose name is known only to you will be used. The advantages are as follows: no one will hack the root account, since it will always be turned off. There is one drawback — password authentication is not as reliable as public key authentication.
The second strategy is to use a public key. The disadvantage is a more complex setup, specifically for end users: they will have to generate a key pair, and it will be difficult for a user who has never done this. The big advantage of public key authentication is that no one will be able to reset the password and gain access to your virtual server.
If you are going to use key authentication, then you can skip chapters 2 and 4 — there is no need to create an additional account and add it to sudoers. But chapter 3 is worth reading, as a good editor will be very useful to you.
Creating a regular user
After purchasing a virtual VDS server, the client will receivethe root password is assigned, after which the user inserts it into the profile of his SSH client. But you can't do that. Firstly, the root account is a well—known username, and when a hacker starts trying to hack your server by brute force, he will start with the root account. He doesn't know the accounts you created, but everyone knows root. Therefore, we need to create a regular user that you will always work under.
Create your own account (be sure to change the name to your own):
adduser userpasswd userThe adduser command will add a new user named user.
The passwd command will change the password of the new account.
Just don't create an admin user, please!
In order for this user to work with root rights, you will need to add him to sudoers. To do this, you need an editor, not just an editor, but a convenient editor!
Installing a convenient editor
The default Vi editor used by the vast majority of providers is very inconvenient and requires additional knowledge, which can scare a novice user.
Always start by updating the package lists before installing the software. You can do this using the apt update command. You need to update the package list at least once — before the first installation. Then they perform updates as needed.
# apt update |
So, install any convenient text editor that you like. I like the nano editor:
# apt install nano |
You can run it separately using the nano command. Finding the location of the editor:
which nano
It is usually located here /bin/nano. Now, let's set it up with the default editor. In recent versions of Ubuntu, this is done this way:
update-alternatives--config editor |
Now select nano from the list. If this method does not work (there is no update-alternatives command), specify the environment variable EDITOR:
export EDITOR=/bin/nano
To start automatically each time you log in, edit the file.bashrc, which is located in the user's home directory. Add the command to it
export EDITOR=/bin/nano
This operation must be performed for each user. For the root account, the home directory is /root. For the spysoftnet account — /home/spysoftnet.
After these manipulations, all commands will call the nano editor. One of them is visudo.
Administrator rights
Previously, we created a regular user user. Now you need to turn him into an administrator, that is, provide the opportunity to use sudo. Enter the command in the terminal
visudo
This command will launch a text editor to modify the sudoers configuration file. Find and uncomment the line:
wheel ALL=(ALL) ALL
The specified line allows all users of the wheel group to use the sudo command. If it has already been commented out, nothing needs to be done. Press F10 to exit the editor.
After that, add our user to the wheel group:
usermod-aG wheel user
Next, disconnect from the SSH server and try to log in as a user with the previously set password. Note that when you were working as a root user, the command prompt looked like #, now it looks like $. After logging in, enter the command:
sudo bash
If the command prompt has changed to #, you now have root rights. This trick allows you to enter commands as root without using the sudo command, which is undoubtedly more convenient.
Banning login as root via SSH
The only thing left is to prohibit the root user from logging in via SSH. To do this, working already under the new user user, enter the command:
sudo mcedit/etc/ssh/sshd_config
Add this line to the SSH server configuration file (or uncomment it):
PermitRootLogin no
Save the configuration file, restart SSH (systemctl restart ssh) and try to connect as the root user — you will not succeed.
You need to restart SSH only if you are sure that you can log in as a user (you can enter the sudo command on behalf of this user)! Otherwise, there is a risk of losing access to the server, and then you will have to contact support.
Alternatively, you can not disable the login under the root account, but configure the login by key (see below) and only after making sure that you can log in as root by key, add a line to the SSH config:
PermitRootLogin without-password
Of course, after that you need to restart SSH again.
Logging in to the server with a key
There is a practice of authentication by key (public key authentication), and not by password. We will not consider the advantages and disadvantages of this method, there are only advantages here — no one will pick up the password, since it simply does not exist. This is the most reliable authentication method.
The principle of key authentication is as follows: a key pair (public and private) is created. The private key is stored on the client side, and ideally it is not accessible to anyone. The open file is uploaded to the server to be accessed.
In an ideal world, the keys should be generated by the users themselves. They can be generated using the ssh-keygen command, as well as using the SSH client functionality (for example, Bitvise SSH Client and many other clients have the ability to create a key pair). If you have Linux, you don't need to install any additional software. Enter the command:
$mkdir~/.ssh;ssh-keygen-trsa-b2048-f~/.ssh/id_rsaHere we generate RSA keys with a length of 2048 bits. After the keys are generated, the public key will be available by name:
~/.ssh/id_rsa.pub
Next, you need to transfer the public key to the server. The easiest and correct way to do this is to use the ssh—copy-id command:
ssh-copy-id username@remote_host
Your local computer simply does not recognize the remote server — this is normal when you first connect. Type yes (yes, not y) and press Enter. The ssh-copy-id command will find the created key and send it to the server. The contents of the ~/.ssh/id_rsa.pub key will be copied to the ~/.ssh/authorized_keys file of the deleted account. This method will work if password authentication is still in effect.
At the initial setup stage, this is a common thing — first, all users generate key pairs and upload their public keys to the server, and then the password login is closed. But if password login is already disabled, and you need to upload the key for a new user, then you will need to find a way to deliver the key (id_rsa.pub file) to the server. Next, go to the ~/.ssh directory of the account for which the key is being configured and place the contents of id_rsa.pub at the end of the authorized_keys file:
cat id_rsa.pub>>authorized_keys
But let's not make unnecessary assumptions and complicate our lives. We believe that password access is still open and it is enough to use the ssh-copy-id command to upload the keys to the server. When all users' public keys are uploaded, you can disable password login. To do this, open the /etc/ssh/sshd_config file in any text editor and set the PasswordAuthentication directive to No:
PasswordAuthentication no
You also need to make sure that the following three directives are set this way:
PubkeyAuthentication yesAuthorizedKeysFile%h/.ssh/authorized_keysPermitRootLogin without-passwordThe first one enables authentication using a public key, and the second one specifies the name of the file where the keys should be stored. The third one allows you to log in as root without using a password (by key).
It remains to restart SSH:
systemctl restart ssh
On the client side, you can log in to the SSH server using the key as follows:
ssh-i~/.ssh/id_rsa.pub user@example.com
Here we specify the key file name, user name, and server name. In Windows, you need to configure the SSH client you are using, for example, in Bitvise SSH Client, you need to click the Client key manager link button on the Login tab and click Generate New in the window that appears. In the Generate New Keypad window, you can simply use the Generate button. Or you can additionally protect the key pair with a password — to do this, enter the password, confirm it and click Generate. It is recommended to use a passphrase — if during your absence someone starts an SSH client and tries to connect to the server using your public key, they will fail because they do not know the password.
The password is needed to access the key pair only on the local computer, it is not transmitted in any form to the server. After the key pair is generated, you need to click the Export button to export the public key. The format is OpenSSH. After you save the public key in a file, upload this key to the server and add its contents to the file:
~/.ssh/authorized_keys
There are many ways, for example, you can use an account that already has authentication configured to download this file. You can upload the key to some website and download it on the server using the command:
wget http:// address / file_name
In general, show imagination, and you will succeed. After the server "learns" your key, select the Initial method — publickey in the main client window, and from the Client Key list, select the profile in which you saved the key.
VDS protection. The main window of the Bitvise SSH Client
Installing a non-standard SSH port
SSH uses port 22 by default. But you can reconfigure it to another port for security reasons — then you also need to know the port number to connect via SSH. Open /etc/ssh/sshd_config and find the Port directive. Specify a different port instead of 22:
Port2206
After that, restart SSH and log in again. When logging in to the client settings, specify the new port number.
Configuring the Firewall
Having dealt with user security, you need to set up a firewall. Traditionally, iptables is used as a firewall (packet filter) in Ubuntu, but since Ubuntu is positioned as a simple distribution, the corresponding shell for iptables was developed — UFW (Uncomplicated Firewall). This is a simple firewall. First of all, make sure that the ufw package is installed at all, and install it if it is not:
sudo apt install ufw
Basic Firewall Configuration
Now let's look at the firewall status:
sudo ufw status verbose
By default, the packet filter is disabled, so the command will display the Status: inactive message. There is no need to rush to turn on the firewall: first you need to configure it. After all, if port 22 is unavailable by default, then you will lose access to your VDS. Of course, support will help, but it's a waste of time.
With basic settings, the firewall disables all incoming connections and allows all outgoing ones. Such a policy is ideal from a security point of view, because if someone (including you) wants to connect to it, they will not succeed. At the same time, applications on the server will be able to create outgoing connections.
Consider two commands:
ufw defaultdeny incomingufw defaultallow outgoingThese two rules set the default policy: all incoming connections are denied and all outgoing connections are allowed.
So, all incoming connections are prohibited. In order for the server to be reached by a specific port, it must first be opened. UFW is good because the administrator does not even need to remember the port number — you only need to know the name of the service. For example, here's how to allow SSH connection:
ufw allow ssh
At the same time, UFW itself will create a rule for port 22 — this is the port used for SSH. The firewall knows the ports and names of all common services (HTTP, SSH, FTP, SFTP, and so on).
However, if you have reconfigured SSH to a non-standard port, you must explicitly specify the port number:
ufw allow2206
After SSH is enabled (this is the main thing so that the firewall does not break the connection now), you can enable ufw with the following command:
ufw enable
It is necessary to confirm the launch:
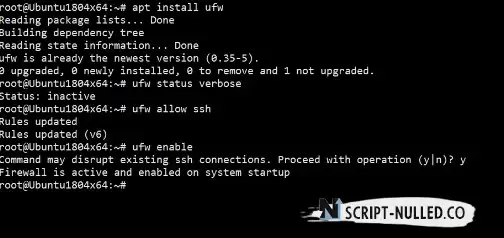
Protection of the virtual server. Basic setup
Let's figure out what happened. First, we allowed SSH and received the Rules updated response, that is, the rules have been updated. Then we turn on the firewall and get a message that it is active and will start when the system boots. This completes the basic configuration — SSH is working successfully, and we can proceed with further configuration of the packet filter.
Creating rules for services
Now you need to allow other applications to work. As a rule, you need to allow the HTTP service (web server), FTP (if you need this service) and try not to forget about HTTPS (which is very important lately):
ufw allow httpufw allow httpsufw allow ftpIt would be possible to do the same by port numbers:
ufw allow80ufw allow443ufw allow21If desired, you can allow a range of ports, specifying the transport protocol (UDP or TCP):
sudo ufw allow2000:2200/tcpsudo ufw allow4000:4400/udpIP Address Resolution
Ufw allows you to allow a specific IP address to access all ports of the server, for example:
ufw allow from111.222.33.44
If you need to allow access to a specific IP address only to a specific port, then this is how it is done:
ufw allow from111.222.33.44toany port22
Here we do not allow all SSH connections, but only connections from the IP address 111.222.33.44.
You only need to do this if you have a permanent IP — you can get such an IP for an additional fee from your ISP. Usually users have dynamic IP addresses - if you look at your external IP right now, specify it in the command above, then as soon as your IP changes, you will lose access to the server. So be careful!
You can allow access to an entire range of IP addresses (for example, when the admin has a dynamic IP) in this way:
ufw allow from123.45.67.89/24toany port22
Banning IP addresses and services
To deny access from a specific IP address, use this command:
ufw deny from123.45.67.89
If desired, you can disable all connections to a specific service:
ufw deny ftp
Deleting and resetting rules
Reset all rules with the following command:
ufw reset
But before entering this command, make sure that you have disabled the firewall (ufw disable command), otherwise you will lose SSH access.
You can delete a specific rule by number. First, enter the following command to find out the rule number:
ufw status numbered
Next, enter a command like this:
ipfw delete <rule number>
Setting up a backup
As a rule, in the admin panel for managing servers and other provider services, it is possible to set up backups for each server. Depending on the terms of the tariff plan, the backup may be free (that is, you can use some amount of space for backups), or it may be paid. As practice shows, providers often require a fee for storing backups, so the backup option itself, although available, is turned off so that the client does not have additional expenses.
As a VDS admin, you have two options. The first is to use the provider's backup tools, the second is to set up backups on your server. A backup on the provider's side is more reliable, since the backup is stored outside the server. The second option is less reliable, because if something happens to the server's file system, you will lose all your data.
What should I do? It is best to use a combined system — set up backups on the provider's side with an average frequency, say once a week. With such a frequency, the bill for backups will not be cosmic. But if something happens to the file system, you can restore the data, even if it is not the most up‑to-date, but it is better than starting from scratch.
And now let's talk about manual backup on the server side. There are whole backup solutions. Whether they are needed or not is up to you. I suggest we take the simplest path. The first step is to determine which data should be backed up.
If you have a website on the server (for example, an online store), then you only need to copy the files of the web server's root directory (DocumentRoot, usually /var/www/html, but depends on the server settings) and the database.
The web server files can be copied once a week — they change relatively infrequently. If you make a backup using the provider's tools, say every Friday, then you can backup the server files in the middle of the week — on Wednesday. Then you will have two backups in a week, just in case. You can do it more often — the main thing is to have enough disk space. If you have 1 TB and the site weighs 250 GB, then very often you will not have to create backups.
You can create an archive with a backup copy of the site files using the command:
zip-r/backups/latest.zip/var/ww/html
This command needs to be added to the crontab schedule. Enter the crontab –e command and add a line:
02**3/usr/bin/zip–r/backups/latest.zip/var/ww/html
It is best to do a backup at night to reduce the load on the server. Here, a copy will be created on Wednesdays at two in the morning. You can unzip the archive using the unzip command.
Now about the database. Changes are constantly being made to the database: managers add information about products, some import script changes prices and product balances, and visitors place orders. Therefore, a copy of the database should be created once a day. We use mysqldump for the copy:
mysqldump-ucp_user-p--opt cp_main_v2--max_allowed_packet=100M>db-latest.sqlHere cp_user is the database user name, cp_main_v2 is the database name, the max_allowed_packet option sets the maximum packet size — in case the database takes several gigs, this option will save you. The backup is done in the db-latest.sql file. You can recover like this:
mysql--host=127.0.0.1--port=3310--max_allowed_packet=100M-ucp_user-pcp_main_v2</db-latest.sql
The purpose of the parameters should be clear. The host and port parameters can be omitted if MySQL runs on localhost and uses a standard port. The dump creation command needs to be run every day, so we add the line to the crontab
01***/usr/bin/mysqldump-ucp_user-p--opt cp_main_v2--max_allowed_packet=100M>/root/db-latest.sqlThe backup will be taken every day at one o'clock in the morning (and at two we start creating backup files).
In addition to backups, do not forget about snapshots! Before each significant change on the server (such as installing an extension, rebuilding a CMS, updating software, for example, installing a new version of PHP), take a snapshot. Yes, you can always recover from a backup, but our backup is not the most recent, and such a recovery takes more time than restoring from a snapshot. Snapshots are also paid, but their price is negligible against the background of production server downtime.
Installing the admin panel
Personally, it is easier and more familiar for me to manage the server via SSH. But if you need a graphical interface to perform daily routine tasks, you can install the control panel. The choice of a specific panel depends on two factors: the required functionality and the cost of the control panel. If you need free solutions, look towards Webmin and VestaCP. Other options are less popular.
Conclusion
Actually, that's all — the basic configuration and protection of the VDS virtual server is complete. Now you can start installing and configuring the necessary software (Nginx, MySQL, PHP and all that).