Spain
Spain
 Portugal

INSTALLING AND CONFIGURING A WEB SERVER FOR A SITE IN UBUNTU
Setting up a web server to develop a PHP website in the Ubuntu operating system is a task that a web developer should be able to handle. In this article, we will figure out how to install and configure a LAMP server (Linux, Apache, MySQL, PHP) for your sites.
WHAT IS A LAMP?
LAMP stands for Linux, Apache, MySQL, PHP. A combination of Apache, MySQL, PHP technologies is necessary in order to launch websites of both own development and sites on popular CMS: WordPress, Joomla, Prestashop, Drupal and others.

We will install and configure each component individually.
INSTALLING APACHE
Apache is an open source web server. The operation of the web server can be described as follows: For each request, the web server responds depending on the request.
In other words, by analogy, if you ask a person a question, he will answer you or not.
But if you ask him a question that he can't answer, the person will answer you I don't know. Our Apache web server works similarly.
To install the Apache web server, enter the command in the terminal:
sudo apt-get install apache2
You can read what the sudo command is and why it is needed in this article.
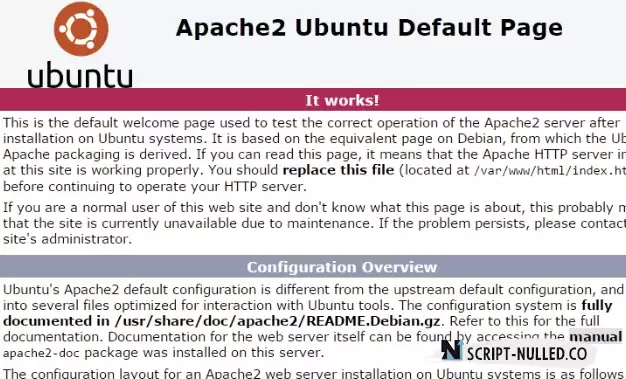
After installing Apache, to check the health of the web server, enter the IP address of the server in the browser.
If you installed the Apache server locally, for example on your home computer, type 127.0.0.1 in the browser and you should see the welcome page of the Apache web server.
 INSTALLING PHP
In order to install PHP on your server, you need to run the command:
sudo apt-get install php5 php5-common libapache2-mod-php5 php5-cli php5-cgi php5-mysql
In this article, we will not dwell in detail on the names of the installed packages that we install with the php5 package, so we move on.
After executing the command above, type php -v in the terminal and you should surprise the php version:
$ php -vPHP 5.5.9-1ubuntu4.11 (cli) (built: Jul 2 2015 15:23:08)Copyright (c) 1997-2014 The PHP GroupZend Engine v2.5.0, Copyright (c) 1998-2014 Zend Technologies with Zend OPcache v7.0.3, Copyright (c) 1999-2014, by Zend Technologies
If you see this in your terminal, it means that php is installed.
MYSQL INSTALLATION MySQL is a database that stores your site's data. SQL is a query language for the MySQL database. You can read more about the SQL query language in this article.
Installing MySQL on your Ubuntu/Linux server is very simple. To install, enter the command:
sudo apt-get install mysql-server mysql-client
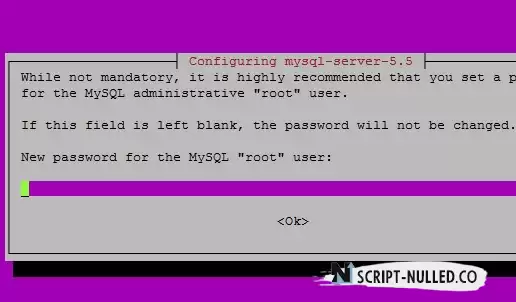
During the MySQL installation process, you will be asked to enter the password for the MySQL root user, then you will be asked to enter the password for the MySQL root user again.
Be careful, write down the password before entering it.
In this article, we have installed not only a MySQL server, but also a console MySQL client. For the convenience of working with MySQL, let's install a graphical web client for MySQL - phpMyAdmin.
To install phpMyAdmin, enter the command:
sudo apt-get install phpmyadmin
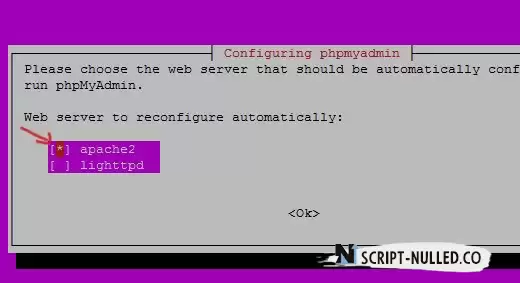
During the installation of phpMyAdmin, you will be prompted to configure the web server and phpmyadmin bundle automatically. At this step, select the auto-configuration for the apache2 web server.
Answer Yes to the next configuration question. After that, you will be asked to enter the password for the root user again.
After that, the installation and configuration of phpmyadmin will be completed. To check the performance of phpmyadmin, enter the ip address of your web server in the browser and add phpmyadmin after the slash.
If you installed phpmyadmin on a local server, type in the browser:
As a result, you will see the phpmyadmin authorization page:

Enter the root and password that you set during the MySQL installation process and you will log in to phpmyadmin.
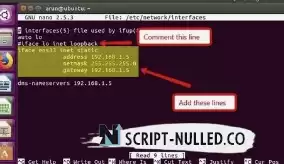
CONFIGURING THE APACHE WEB SERVER CONFIG TO WORK ON A DOMAIN
Very often, simply installing an Apache web server is not enough if you want to develop a website and view it as if it is on the Internet and accessible by your domain name, for example superdomain.com .
Let's set up the Apache2 config in order to implement this.
The first thing you need to do is create a directory for your site on the server. To do this, go to the base directory of apache sites:
cd /var/www/html/
After that, create a directory for your site:
sudo mkdir superdomain
In order for us to make changes to the superdomain directory, we need to change the owner of the directory from the root user to your user.
To do this, enter the command in the terminal:
cd ..
And after that the command:
sudo chown -R user:user superdomain
With the last command, we changed the owner and group of the superdomain directory to your user (instead of user:user, write your user name)
Then go to the created superdomain directory and create a file in it index.php and a php script.
To do this, enter the command in the terminal:
cd superdomain
and enter the command:
nano index.php
after that, insert a php script, for example, with the following content:
<?php

    echo "This is my website superdomain!";

?>
To save the changes in the nano editor, press ctrl+x and the letter y, then enter.
And now we will configure the configuration of the apache2 web server.
To do this, enter the command:
sudo nano /etc/apache2/sites-available/superdomain.com.conf
and paste this text:
<VirtualHost *:80>
         ServerAdmin [email protected]
         ServerName superdomain.com

         DocumentRoot /var/www/html/superdomain
         <Directory />
                 Options FollowSymLinks
                 AllowOverride All
         </Directory>
         <Directory /var/www/html/superdomain/>
                 Options Indexes FollowSymLinks MultiViews
                 AllowOverride All
                 Order allow,deny
                 allow from all
         </Directory>

         ScriptAlias /cgi-bin/ /usr/lib/cgi-bin/
         <Directory "/usr/lib/cgi-bin">
                 AllowOverride All
                 Options +ExecCGI -MultiViews +SymLinksIfOwnerMatch
                 Order allow,deny
                 Allow from all
         </Directory>

         ErrorLog ${APACHE_LOG_DIR}/error.log

         # Possible values include: debug, info, notice, warn, error, crit,
         # alert, emerg.
         LogLevel warn

         CustomLog ${APACHE_LOG_DIR}/access.log combined
</VirtualHost>
After that, press ctrl+x and the letter y, then enter.
In this config, we have created specified paths to the directory of our superdomain site, specified the domain name, rules, email of the webmaster if the user sees an error, paths to apache log files and other settings.
After that, we need to go to the apache directory :
cd /etc/apache2/sites-available/
and execute the command:
sudo a2ensite superdomain.com.conf
If everything is done correctly after entering this command, you should see this:
Enabling site superdomain.com.
To activate the new configuration, you need to run:
  service apache2 reload
To apply the new apache config for our site superdomain.com enter the command:
service apache2 reload
If after running the above command, the apache2 web server does not swear at errors, then you did everything right and the last step remains to launch our site from the domain superdomain.com .
If you don't understand the commands that you type into the Linux terminal, read the article about Bash commands.
The last change that needs to be made to run the site on the domain superdomain.com , enter the ip address of the server in the hosts file (in this example, the local web server) and the domain name superdomain.com:
127.0.0.1 superdomain.com
The hosts file is located on Linux:
/etc/hosts
In the Windows operating system, the hosts file is located:
C:\Windows\System32\drivers\etc\hosts
Everything is ready! Save the hosts file and enter in the browser
superdomain.com
As a result, you should see the php output of the page index.php from the superdomain catalog.
conclusions
In this article, we have set up a LAMP server in the Ubuntu operating system. Similarly, you can create apache2 directories and configs for your other sites.