Spain
Spain
 Portugal

Installing and configuring Apache on Ubuntu 22.04
Web servers are understood as both physical machines and special software. From the point of view of software, a web server is a program that implements server logic in a client-server architecture: accepts HTTP requests from clients and returns the appropriate responses.
There are a large number of different web servers on the market that offer additional functionality to their users. Depending on their needs, the user can choose the most suitable solution for their tasks.
The most common web servers in 2023 are Nginx and Apache. In this article, we will tell you how to install and configure Apache on the Ubuntu 22.04 operating system.
What is Apache?
Apache HTTP Server or simply Apache is a free, open source, cross—platform web server. It was developed in 1995 by a group of developers to eliminate the shortcomings of the popular NCSA HTTPd web server at that time.
NCSA HTTPd was one of the first web servers. It was developed in 1993 at NCSA, University of Illinois. It was distributed for free and allowed users to post the first pages on the Internet, but NCSA HTTPd had limited capabilities compared to modern web servers and a number of other disadvantages, which eventually resulted in the appearance of Apache.
A year after its release, Apache gained popularity among hosting companies and developers due to its new functionality and cross-platform nature. In 2005, about 70% of all servers on the network were running on Apache. Now this figure is around 20%, and Apache's main competitor is Nginx.
Apache consists of two main components: the core and modules. The core performs the basic functions of a web server: processes configuration files, performs HTTP-related actions, and loads additional modules. The modules allow you to expand the core's basic functionality: support for new programming languages, user authorization, and increased security. The Apache team is working exclusively on the kernel.
In general, the advantages of Apache include:
Free Software;
Customization: The Apache web server can be easily customized to specific goals and objectives due to the large number of additional modules and open source.
A large community;
Cross-platform;
A good level of performance and security.
And the cons:
Resource requirements, especially when servicing a large number of simultaneous requests;
Limited multithreading: Apache uses multiprocessing technology, putting each connection in a separate thread. The number of such streams is limited, which has a negative effect on a large number of requests;
The complexity of the setup is due to the large number of settings.
Installing Apache
Apache installation is performed in several steps:
Step 1. Update the apt package indexes
Before installing any software on Ubuntu, you first need to update the package indexes. This will keep the latest packages available for installation in the repository.
To update the APT package index to the latest version, run the following command:
sudo apt update
Step 2. Installing the Apache Web Server
Installing the Apache web server on Ubuntu is a simple process that involves executing a single command and restarting the system. To install Apache, run the following command:
sudo apt install apache2
Then restart the system.
Step 3. Apache Startup and Startup
To start the Apache service, run this command:
sudo systemctl start apache2
This command will have to be executed every time the server is started. To avoid this, we will add Apache to the startup:
sudo systemctl enable apache2
Step 4. Checking the Apache Server Installation
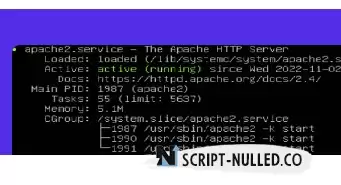
Let's check the status of the Apache service to make sure the installation is successful:
service apache2 status
Configuring the Firewall
Now that you have installed Apache on Ubuntu, you need to allow external connections through the UFW firewall.
UFW (Uncomplicated Firewall) is a command line interface for iptables, which is a firewall for Linux OS. It is designed to simplify the management of firewall rules, making it more accessible to beginners. UFW allows you to easily configure firewall rules, such as opening or closing ports, blocking or allowing network access, etc.
UFW is a simple and effective way to ensure the security of your server or computer. It can be used for both home users and businesses.
You can skip this section if UFW is not running on your server or a firewall is not installed. But it's not completely secure, so to ensure the security of your device, we recommend that you use a firewall.
With the firewall enabled, you may find that it is not possible to connect to the Apache server from a remote device. This is because the ports that Apache uses are closed by default. We are talking about port 80 (for HTTP) and port 443 (for HTTPS). Let's open the connection to both ports
Let's start by opening port 80. Connections to Apache via HTTP will pass through this port.
Even if you plan to work only with HTTPS connections, it is not superfluous to open connections on port 80 so that you can redirect them to HTTPS.
First of all, let's check if the UFW firewall is enabled:
sudo ufw status
We should see the Active status. If this is not the case, run the ufw service with the following command:
sudo ufw enable
To allow access to port 80 using UFW, we can use the following command in the terminal:
sudo ufw allow 80
Also, if you plan to use HTTPS with the Apache server on Ubuntu, you will also need to open port 443.
Port 443 is the port through which HTTPS works by default. Therefore, if you have visited a site using the https:// protocol, your web browser will use this port.
You can resolve this port using this command:
sudo ufw allow 443
Visiting your website
Now that you have installed the Apache web server on Ubuntu and opened connections in the firewall, let's try to log in to it.
After visiting the server page, we will see only the default page. This is a good indicator that everything is working correctly.
If you plan to connect from a remote device, first of all you need to find out the IP address of the Apache server. There are several ways to find out.
The easiest way is to use the hostname command with the -I option. The command will output a list of IP addresses assigned to your device as a result.
hostname -I
For example, our test server is assigned only a local IP address, which we see below.
192.168.0.215
You need to go to this address in any browser. If you are accessing directly from your Ubuntu server, you can use 127.0.0.1 or localhost instead.
After going to this address, you should see a page similar to the one shown in the screenshot below.
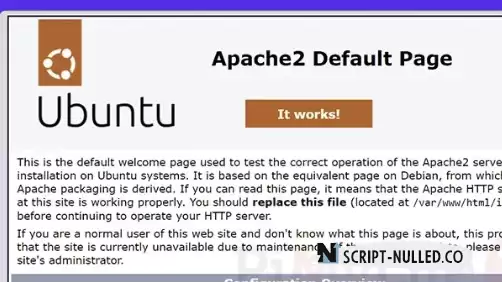 This indicates that you have successfully launched Apache on Ubuntu.