Bitrix and integration with 1C
Bitrix and integration with 1C
[short educational program for beginners]

You have developed an online store on Bitrix. During development, you created all the necessary properties and filled the catalog with demo products.
It remains only to download the real catalog from 1C — this means that there is still a lot of work ahead. We will have to ensure that all the necessary data is uploaded at all and uploaded to the right place. Otherwise, you will have to adjust the project to the data structure from 1C.
The issue of integration is raised at every more or less large online store. It is often difficult for developers, not just beginners, to understand how the exchange mechanism works. Useful information is scattered on the Internet, it will be convenient to collect it in one place.
Objectives of the article
Briefly outline the main features of the exchange and its algorithm of operation;
Provide links to official and other useful sources;
Answer frequently asked questions;
To clarify where to start integration and how to complete it successfully.
Standard exchange between 1C-Bitrix and 1C
Bitrix has built-in functionality for exchange with 1C, so any exchange should be configured in a couple of clicks.
However, for this 1C must be a “clean” typical configuration. In fact, every first 1C is “atypical”, that is, modified one way or another.
As such, the exchange is really set up quickly and easily, but often (almost always) the matter does not end there, since not all data is unloaded from 1C or unloaded in the wrong place (including due to modifications in 1C).
What the regular exchange mechanism can do
Import of the catalog of goods from 1C to the website;
Exporting a product catalog from a website to 1C;
Exporting orders from the website to 1C;
Import orders from 1C to the website;
Import of reference books (highload-infoblocks) from 1C to the site.
Useful links
Integration functionality
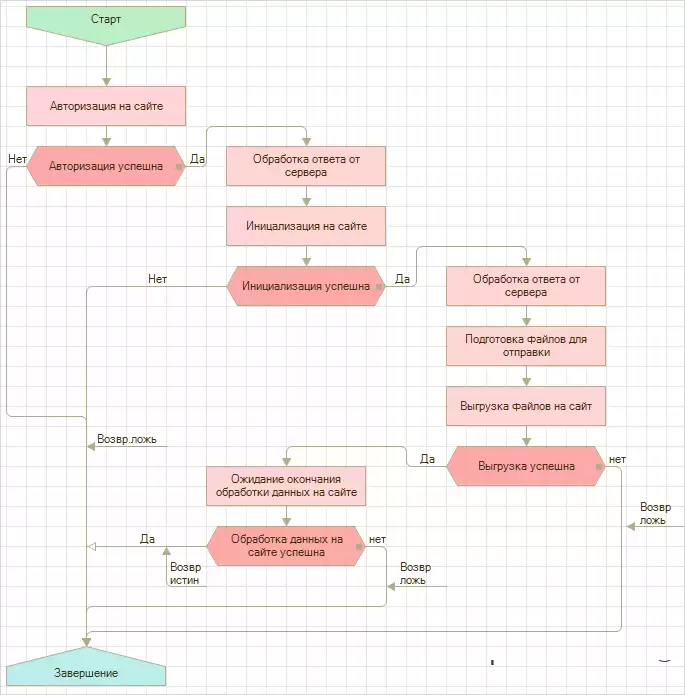
Algorithm for uploading data to the site
1C is always the initiator of the exchange, for security reasons — even if the site is hacked, it will be impossible to attack 1C, since the site does not know how to access 1C and does not know anything about it at all.
The exchange works by means of consecutive http GET/POST requests from 1C to the site, to the script /bitrix/admin/1c_exchange.php .
The exchange consists of several key stages
1C authorization on the website;
Uploading files from 1c to the website;
Reading xml files to a temporary table;
Data processing.
The stages of loading, reading and processing are done in many steps. The duration of each step is set in the exchange settings on the site side. On the 1C side, the step duration limit must match.
The process of uploading data from 1C to the site can be represented as the following scheme
Data format for exchange with 1C
1C uploads xml files and images to the site when importing goods.
If zip compression is enabled in the exchange settings on the site side (enabled by default), then 1C downloads one archive, otherwise all files separately.
XML file format
The information in the files is structured in accordance with the CommerceML2 commercial information exchange standard.
Information about products is transmitted to the site in the following files
import.xml - products, groups (sections of the information block), price types, warehouses, properties of goods and units of measurement;
offers.xml - trade offers (TP) of goods and their properties;
prices.xml - TP prices;
rests.xml - remnants of TP;
references.xml - user reference books (HL-infoblocks).
Files import.xml and offers.xml they contain descriptions of properties, price types, and other information that applies equally to all goods/TP.
If the directory is large, for optimization purposes, descriptions are uploaded in separate “header” files. These are the same files import.xml and offers.xml , only do not contain anything other than descriptions. In this case, header files are processed only at the very beginning of the exchange.
Information about orders is transmitted to the site in the following files
documents.xml - documents (orders);
contragents.xml - counterparties (users-buyers).
Useful links
General description of XML files
Where the upload files are uploaded to the site
To the /upload/1c_catalog/ folder. This folder is cleared before each exchange. That is, there are always files of the last exchange in this folder.
You can enable the "debug mode” of the exchange — disable overwriting of files in the 1c_catalog folder. In this way, you can disable the deletion of upload files after the exchange is completed.
To do this, you need to declare a constant in the file dbconn.php:
// Enables "debugging mode” for sharing with 1C,
// disables overwriting files in the 1c_catalog folder
// So that all files are saved after uploading.
define("BX_CATALOG_IMPORT_1C_PRESERVE", true);
Now, instead of deleting the folder, it will be renamed, a numeric identifier will be added to it.
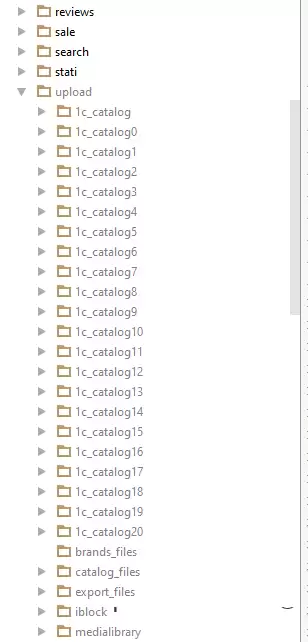
The larger the number of a folder, the newer this folder is.
However, the newest folder will always be without numbers, and only with the next exchange it will be renamed.
It is important to remember that with debugging mode enabled, disk space is consumed very quickly. Therefore, after debugging, you should disable the log and delete all unnecessary exchange folders.
What you need to exchange on the site side
of the Bitrix editorial office “Small Business” or “Business”
configure the exchange parameters
create a user and a group “Exchange with 1C” for exchange, configure the rights
to allow the group to unload goods/orders (in the parameter settings)
allow the group read access to the /bitrix/admin folder/
What you need to exchange on the 1C side
install the exchange module (depends on the 1C version)
configure the site address and the site user from the Exchange with 1C group
configure the upload parameters on the 1C side (depends on the UT version)
Integration with 1C:UT" ed. 10.3
Integration with "1C:UT" ed. 11.1, ed. 11.2
Useful links
Requirements for 1C-Bitrix for integration with 1C
Directory structure in 1C and on the website
What should I do if the directory structure in 1C does not match the structure on the site?
In 1C, you can specify which products and sections to unload.
Often in 1C, goods are stored differently from how they will be displayed on the site, so you can set up a virtual catalog on the 1C side to upload to the site: create the necessary structure of sections and spread out the goods on them.
You can also set the conditions for the selection of goods (not all goods are needed on the site) for uploading to the site and properties (there are a lot of sv-v in 1C, not all are needed on the site).
Types of uploads from 1C
Full unloading
Occurs when data is uploaded to the site for the first time, or when it is manually launched.
All goods are unloaded.
Images are uploaded only for new or modified products.
Brief unloading
Occurs frequently, between full, contains only changes in prices and balances.
Full forced unloading
The same as full unloading, only pictures of absolutely all goods are unloaded, without fail.
It is usually used only when debugging the exchange.
How to start integration with 1C
If you are making a new website and plan to integrate with 1C in the future, then you should install bitrix first and make a test exchange. Here's what it will give:
The iblock type will be created;
An iblock will be created;
sv-va and reference books will be created;
The catalog sections will be created;
Catalog items will be created;
Trading offers will be created.
All this together will help you understand what data you already have and where to look for it. It will be immediately clear what is missing, and what was unloaded quite differently than we would like.
How to complete the integration
To compare the data structures on the site with the structure in 1C is the main goal of integration.
To successfully complete the integration, when you already have a fully working project with up-to-date data, you need to ensure that the upload from 1C takes place:
To an existing information block;
In the existing sv-va;
To the existing sections of the information block;
To existing products and trade offers;
Into existing price types.
All these tasks are solved by setting up identical identifiers (XML_ID), that is, you must match all external codes on the site with external codes from 1C.
Thus, if you first made a website, and then decided to attach an exchange with 1C to it, then you will need to get all the XML_IDS from 1C and update them on the site (write a service script for these purposes).
Since on the 1C side there is often no way to change these codes (from experience with 1C programmers). An intelligent 1C user can generate a csv file with a list of sections and codes in 1C, then you need to update these codes on the site.
Let's summarize the results
It doesn't make sense to start developing a website by setting up an exchange with 1C for various reasons.
However, if you know in advance that you have to do the integration, start by examining the upload files and test uploading to the site "as is".
The sooner you understand what needs to be finalized in the exchange so that everything works as it should, the better.
Soon I plan to prepare articles on debugging unloading and customization. Don't switch.
Go back